

 Supercharge Your Dev Team
  Secure Your Dev Team
  GitKraken Desktop
 GitLens for VS Code
 GitKraken CLI
 GitKraken.dev
 GitKraken Browser Extension
 Git Integration for Jira
 Pricing
Learn how to set up and manage your NextJS site, from the initial theme cloning to final production on Netlify, using GitKraken and Buddy. This was the first of two webinars in our collaboration with Buddy.

Dwayne McDaniel
GitKraken Developer Evangelist

Maciek Palmowski
WordPress Ambassador at Buddy & GitKraken Ambassador
We were thrilled to host the first of two webinars with Buddy, a company with a goal of making it easy to implement Continuous Integration/Delivery/Deployment. While GitKraken and Buddy both concentrate on different areas of developer needs, we also both believe that better visualization leads to better results.
GitKraken Developer Evangelist, Dwayne McDaniel was joined by Maciek Palmowski, WordPress Ambassador at Buddy and a GitKraken Ambassador, to talk through setting up a NextJS site and deploying it on Netlify.
We’re going to walk through the steps of the webinar so you too can build a Jamstack site and deploy it using Buddy and the GitKraken Git client, available for free download.
Continuous Integration & Continuous Deployment with Buddy
Maciek summed up why we have seen a rise in the adoption of CI/CD very well: “If something is repeatable, it is boring and we are likely to make mistakes.”
By automating as much as we can, we can add in many more useful steps; steps we likely would not have done correctly by hand, if at all. Examples of steps you can automate would include: compiling code, removing unused CSS, adding in all sorts of tests, and even checking for typos.
Most CI/CD providers rely heavily on single, large configuration files, often written in YAML. This requires the mental energy to remember the entire model of the services you’re trying to provide, while also manually writing very specific parameters. If you’re just starting with CI/CD, configuring all the moving pieces can become overwhelming very quickly.
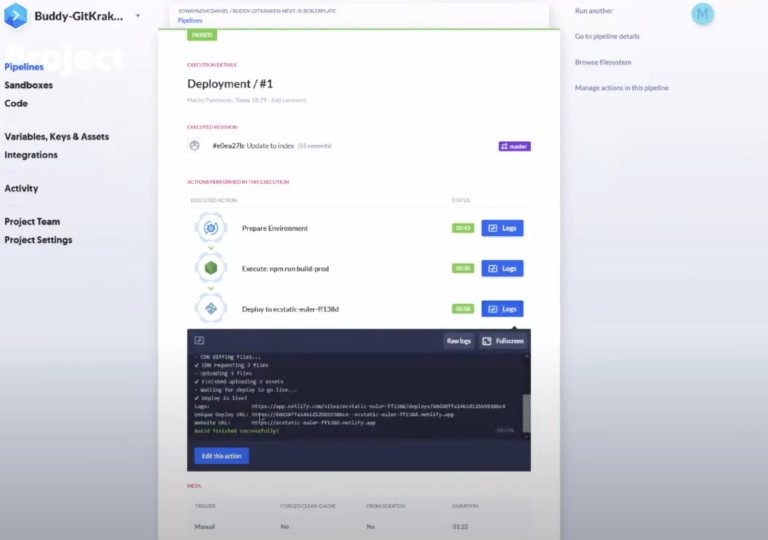
Buddy provides a visual way to stack pipeline actions together ‘like LEGO’. Each step is an independent action, and you can see exactly what the pipeline is doing. This allows you to only modify a single step at a time. It’s much easier to get started with CI/CD, as you can build each action and test it before moving on to add more steps.
This is very much in line with our mission at GitKraken: to help make it easy for all developers to get going with Git, and give them a safe way to do more advanced workflows. The visualization offered by the GitKraken Git GUI is key in seeing exactly what is going on, clearly and quickly, even if you have just cloned the Git repository.
In the webinar, we show off that visualization is more than just the graph. When Dwayne first clones the repository, without doing anything special or custom, he can instantly see what remote branches are available, what GitHub Pull Requests are open, and the whole history of the project from a single interface. And once the Jamstack site is spun up locally, it’s easy to tell what branch you’re on and if those changes have been incorporated into the `main` branch on the remote.
Building Your Jamstack Site with NextJS
Once the code has been cloned, you will want to take a pause to look at the codebase. For this webinar, Dwayne and Maciek chose to use NextJS to build a Jamstack website. NextJS is leading the pack when it comes to Jamstack and decoupled web applications. According to HTTP Archive’s 2020 Web Almanac Report, NextJS accounts for 58.59% of framework adoption in 2020, up from 47.89% in 2019. There are a lot of advantages to this React framework, like fully server-rendered pages, SEO, caching and automatic static optimizations built-in. There are way too many to get into here, but there are a lot of articles that dig into the specific advantages.
This webinar was based on a specific Boilerplate theme because it gave us a chance to showcase TypeScript and Tailwind CSS.

TypeScript vs Javascript
TypeScript is a subset of JavaScript that Microsoft developed to add static type definitions. In regular JavaScript, you can assign any value to any variable. If you are expecting to return a string and instead get an integer back, you’re going to have a bad time.
Building in validation then becomes a piecemeal process that every dev is going to handle their own way, making collaboration a lot harder. With static typed languages, like Java, C, and now TypeScript, you define up front each variable’s type, and the variable will error as soon as it’s assigned a value of another type. Using TypeScript can help bring type validation consistency to all your JavaScript projects.
What is Tailwind CSS?
Tailwind CSS is a utility-first CSS framework packed with classes like flex, text-center and rotate-90 that can be composed to build any design, directly in your markup. One of the reasons Tailwind CSS is gaining so much traction against older tools like Bootstrap is that Tailwind automatically removes all unused CSS when building for production. Your final CSS bundle is the smallest it could possibly be; most Tailwind projects using the current version ship less than 10kB of CSS to the client.
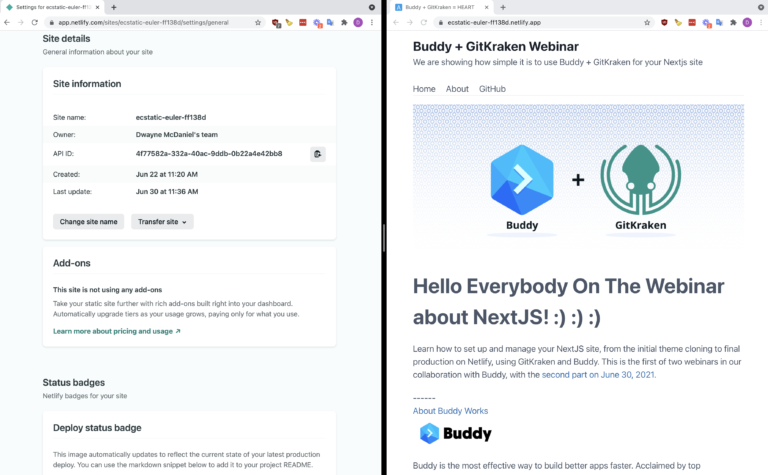
Connecting to Netlify
Now that we have a working bit of code locally and ready to deploy, here is where Buddy comes in. After we set up our Netlify site to just act as a host and not try to build our site for us, Maciek shows how easy it is to start a new project in Buddy.
The first step is simply finding and connecting to the GitHub repo. Once the project is imported to Buddy, Maciek can set up a new pipeline to deploy the code. This pipeline is set to run automatically when the GitHub repo gets updated, but you can set it to run manually or on a schedule.
Once your pipeline has been created, you can add some actions. In this example, we will run `npm install` and `npm run build prod`. In this step, it is very easy to check and update your Node versions, something that can get tricky in other CI/CD providers. Next, you will add an action to push that build directly to Netlify. This is a pretty short pipeline, but it is a basis to build from.
One last thing Maciek shows is how to change out the target where Buddy is pushing the build. In this case, you will want to push to your private server using good old fashioned SFTP. With just a few clicks and configuration settings, you can easily modify the pipeline and should see the same site on your local, on Netlify, and on your private server.
Continuing ahead
We are very excited to help introduce folks to these concepts and technologies. At GitKraken, we’re all about helping transform developers’ workflows with better tools – like the #1 Git GUI for Windows, Mac, & Linux. We are so glad there are others in the world who share our love of visualization and making it safe and easy to accomplish some pretty advanced workflows.
There is so much more that we could have implemented and demonstrated that we scheduled a part 2 of the webinar. That happened on June 30th, 2021 and you can find more information about “How to manage Jamstack delivery like a DevOps pro” over on Buddy’s website.
