 GitKraken Desktop
 GitLens for IDEs
 GitKraken MCP
 GitKraken CLI
 GitKraken Insights
 Git Integration for Jira
 Supercharge Your Dev Team
  Secure Your Dev Team
 Similar to how you switch between local branches in Git, you’re going to checkout the remote branch in order to switch to the new branch.
Get complete visibility into your remote repositories when branching in GitKraken.
How do you checkout a remote Git branch using GitKraken?
Visualizing and managing your remote branches without the assistance of a Git client can be cumbersome. Let’s see how the experience looks using the GitKraken Git GUI to checkout a remote Git branch.
From the main interface in GitKraken, you will be able to view your remote branches on the left panel. No need to try to remember branch names or use a command to pull up your remote Git branch list.
To checkout a remote Git branch in GitKraken, you can either double-click or right-click the branch name from the left panel or central graph and select Checkout from the context menu.
You may also use the GitKraken Fuzzy Finder—open via using keyboard shortcut Cmd/Ctrl + P—by typing “checkout” followed by the branch name you want to checkout.
In GitKraken, you can easily confirm the location of the branch you’re checking out in the Fuzzy Finder.
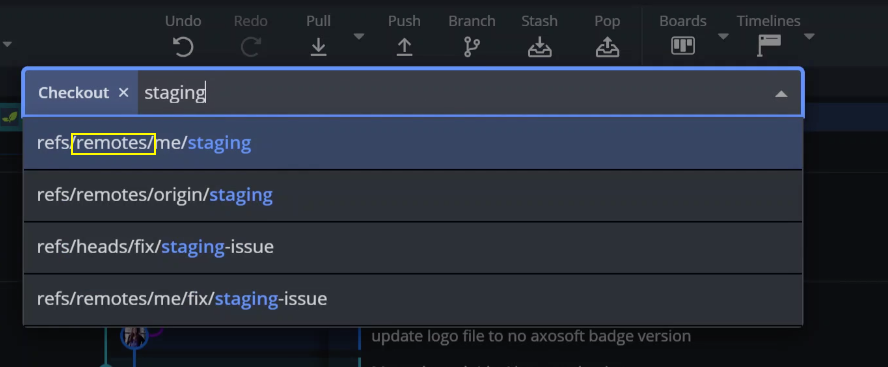
The GitKraken Fuzzy Finder makes daily tasks, like checking out remote branches, a dream.
How do you checkout a remote Git branch using the command line?
If you aren’t using a Git GUI to help visualize your remote branches, you will start by running the git branch command followed by the -r flag. This will pull up a list of your remote branches.
Next, you will run the git checkout command followed by the name of the remote branch. This will checkout your remote Git branch.
Make the process of working with your Git branches, like how to checkout a remote Git branch, easier with the help of GitKraken, the most popular cross-platform Git client for Windows, Mac, & Linux.


